Friday, August 30, 2013

almond-crisped peaches.


September is coming.  

While I can't deny my excitement for the impending arrival of fall - my over-sized blazers can emerge from storage, loafers will soon be my footwear of choice, weekends can actually be spent standing over my stove instead of in front of my air conditioner, there is something always heartbreaking about labor day weekend. The fact that work weeks will actually be full work weeks again, that Friday's don't necessarily mean an early close, that I can't get peaches at the market anymore.  

This was a good year for peaches.  They were juicy and impossibly sweet.  The kind of fruit to eat while standing in a field in cut-off Levis and a white tee-shirt, juices dripping down your chin, a smile on your face.  
This peach recipe is the simplest of simple.  The perfect way to celebrate the end of summer and the fleeing days of freedom.  The kind of thing to be eaten for at the end of an alfresco dinner party or for a lazy Sunday morning brunch. Yes, this can be an elegant breakfast or an equally elegant dessert which is why I love this recipe so much.  

So long summer, you came and went to fast.  

Almond-Crisped Peaches
Recipe adapted from Smitten Kitchen

I couldn't resist messing with this recipe.  Mostly because I saw this as an opportunity to use my bourbon smoked sugar since bourbon and peaches go together like peanut butter and jelly.  (Which reminds me I still need to make my peach infused bourbon, I see this as a weekend project!)  Obviously regular sugar can be used since this recipe is utterly adaptable.  

4 ripe peaches
1/3 cup (55 grams) almond flour
1/4 cup bourbon barrel smoked sugar (can be found here) or raw sugar or light brown sugar
1/4 teaspoon ground cinnaomon
1/4 teaspoon ground ginger
1/4 teaspoon flaky sea salt
3 tablespoons (45 grams) butter, melted

Heat oven to 350 degrees. Halve peaches and remove pits. Place fruit cut side up in baking dish. In a bowl combine the almond flour, sugar, cinnamon, ginger, and sea salt.  Pour the melted butter over the top and stir to combine. Spoon the almond mixture into the center of each peach, then press it flat, as if icing the tops of the peaches with it. Bake for 45 minutes to 1 hour (baking time varies with peach size), until the top is brown and crisp and you can easily slice through the fruit with a fork or spoon.

Serve warm or at room temperature, with creme fraiche, lightly sweetened whipped cream or even plain yogurt, cold, for breakfast.

Thursday, August 29, 2013

hudson and rhinebeck (a food lover's guide.)

The boy and I migrated north last weekend for a weekend away from the city.  I rented us a house on AirBnB (my absolute favorite site at the moment) in the adorable town of Tivoli.  I hadn’t been north to the Hudson/Rhinebeck area in years.  My parents used to take my siblings and I for day trips so we could explore a new area and they could antique.  My appreciation for such activities was at an all time low when I was 10, but now that I am 28 I can appreciate such things (sorry it took me so long Mom and Dad!). 

We filled our weekend with antiquing, eating, and exploration.  It was amazingly fun especially since there are a lot of hidden food gems up there.  Below are some of my favorites.  I strongly encourage you to make the trip up there; it’s a breathtakingly beautiful area with a lot of stuff to do (Hiking! Pick your own farms!  Kayaking on the river!)

All of the below towns are about a 20 min drive from Tivoli.  If you are looking for a place to stay I can’t recommend this place enough. 

Rhinebeck
-Cinnamon Indian Cusine: 5856 Rte. 9 – Really excellent Indian food with very sweet servers.  (The sag paneer was excellent!)
-Bread Alone: 45 E. Market St. – An excellent selection of breakfast pastries but the real reason to come is for the lunch where all there sandwiches are made on their awesome homemade bread.
-Rhinebeck Farmers Market: 61 East Main St. – This Sunday only market has an excellent selection of vendors selling a wide variety of things.  I fell for the man selling homemade honey, the tamale lady, and the butcher with locally raised pork and beef (with very reasonable prices to boot). 
-Del's Dairy Creme: 6780 Albany Post Rd. - A super old school drive up ice cream shop that makes you nostalgic for childhood.  I recomend the $3.50 ice cream sundae!

Hudson

-Café Le Perche: 230 Warren St – Let’s talk about the cheese danish I had here because it was the BEST CHEESE DANISH I HAVE EVER EATEN.  Yes it was and I am stilling dreaming about it and trying to figure out how I can get another one and really soon.  The front part of the restaurant has carry out breads and pastries, the back part is the dine-in area.  The french toast according to my other half was one of the best he has ever had (and he takes french toast seriously).
-Baba Louies: 517 Warren St – Superb thin crust sourdough pizza with a plethora of pizza toppings and unique pies that you can choose from.  They also have a gluten free pizza available if you are one of the unlucky people who can’t have gluten.  A favorite with the locals (or so it seems based on how busy they were.)
-Bonfiglio and Bread: 748 Warren St – An adorable shop with really, really, good rustic style breads (reminiscent of Tartine in San Francisco).  They also sell divine pastries and an excellent cup of coffee. 
-Hudson Farmers Market: 6th and Columbia – Saturday only farmers market.  Like the Rhinebeck one there is a wonderful selection of produce and local products.  We loved the beer from the Chatam Brewing Company, the wide variety of cheeses, and the wonderful produce.  You can basically buy everything you could possibly need to make dinner (and a really good dinner it would be)!

Monday, August 26, 2013

sweet corn ice cream.


There is something to be said for living in the suburbs (or in Upstate New York which the boy and I are currently fantasizing about moving to for the weekends).  The suburbs allow for space.  Outdoor space for a garden, indoor space for an actual dining room table (yes we are those people who eat Indian style on the floor until I find stools that fulfill all my fantasies), space for gadgets and gizmos that are unwieldy when you live in a shoebox sized but are completely necessary when you have a kitchen with more than 2 cabinets.  If we ever find ourselves in a place like that you can pretty much guarantee an ice cream maker will be purchased.  Yes it’s a novelty item but it’s such a fun one that it almost becomes practical.  My parents are blessed with space (even though they may tell you differently) which is why they possess a sausage maker, 4 different sized spring form pans, 3 different sets of dinner plates, and an ice cream maker. 

The last time I was home, I put the ice cream maker to use in an effort to tackle corn ice cream which I have been dreaming about since I had it a few summer’s ago at The Bent Spoon.  Corn ice cream which probably sounds absurdly yucky to some is amazing to me.  Its sweet and clean with an amazing creamy flavor.  It pairs beautifully with fruit especially berries which makes this an excellent end of summer dessert.  

Sweet Corn Ice Cream
Recipe via Melissa Clark at the NYTimes

Melissa serves this with a blackberry sauce.  I served mine with a cherry sauce that my awesome mom made.  Any fruit sauce would be incredible here as would homemade marshmallow crème (or maybe that’s just me…).  They key for this is the best corn possible.  Sweet farmers market corn is the (only) way to go. 

Makes 1 ½ pints
40 minutes, plus at least 5 hours’ standing, chilling and freezing

4 ears fresh corn, shucked
1 1/2 cups milk
2 cups heavy cream
165 grams granulated sugar (about ¾ cup)
6 large egg yolks
1/4 teaspoon fine sea salt
1/4 cup sour cream

Using a large knife, slice the kernels off the corn cobs and place in a large saucepan. Break cobs in half and add to pot along with milk, cream and 110 grams (1/2 cup) sugar. Bring mixture to a boil, stirring, then remove from heat. Let stand to infuse for 1 hour, then discard corn cobs.

Using an immersion or regular blender, purée kernel mixture. Return mixture to a simmer, then turn off heat. In a small bowl, whisk egg yolks, 1/8 teaspoon salt and another 55 grams ( 1/4 cup) of sugar. Add a cup of hot cream mixture to yolks, stirring constantly so they don’t curdle. Add yolk mixture to saucepan, stirring. Cook over medium-low heat, stirring constantly, until custard thickens enough to coat the spoon, about 10 minutes.

Pass custard through a fine sieve, pressing down hard on the solids. Discard solids. Whisk in sour cream until smooth. Let custard cool in an ice bath, then cover and chill for at least 4 hours.

Thursday, August 22, 2013

zucchini whoopie pies.


Considering my undying love affair for whoopie pies, it was only a matter of time before I let myself get creative with them.  I blame my other half for my infatuation mostly because it wasn’t until I ventured north into the great state of Maine that I became acquainted with them (and then obsessed with them).  In Maine they are ubiquitous, the way cupcakes are to NYC.  Some versions are the size of my head (really they are and really I may have eaten the whole thing), some have fillings that veer into the buttercream family (not my favorite) and some are utter perfection.  While I will always hold the traditional chocolate cake one with a marshmallow fluff center as the best of the best, I am willing to test some new flavor combinations in an effort to allow some of the others to enter the running. 

These whoopie pies came about after a bout of inspiration and a lot of starring at the zucchini sitting on the counter taunting me.  The inspiration came from one of my most favorite cakes (this zucchini olive oil cake that will forever be one of the best things I’ve ever eaten) and with that as the starting point, these emerged.  I like to think of these as a grown up version of a childhood favorite.  The combination of spiced cake with a fluffy marshmallow frosting is undeniably addicting which makes these the perfect treat for a picnic lunch or a dessert for a fancy dinner party. 

Zucchini Whoopie Pies
Cake recipe via Gourmet Magazine.  Filling recipe via Not Without Salt

Makes about 12 whoopie pies

For Cakes

2 cups coarsely grated zucchini (10 ounces)
2 1/2 cups all-purpose flour
1 1/4 teaspoons baking soda
1 1/2 teaspoons ground cinnamon
3/4 teaspoon ground ginger
1/2 teaspoon ground nutmeg
1/2 teaspoon salt
3/4 cup well-shaken buttermilk
1 teaspoon pure vanilla extract
1 stick unsalted butter, softened
1 cup packed light brown sugar
1 large egg

For Filling

1 stick (1/2 cup) unsalted butter, softened
1 1/4 cups confectioners sugar
2 cups marshmallow cream such as Marshmallow Fluff (homemade recipe below)
1 teaspoon vanilla

Make cakes: Preheat oven to 350°F with racks in upper and lower thirds. Butter 2 large baking sheets.

Squeeze handfuls of zucchini wrapped in a kitchen towel to remove moisture.

Whisk together flour, baking soda, spices, and salt until combined. Whisk together buttermilk and vanilla in a small bowl.

Beat together butter and brown sugar in a large bowl with an electric mixer at medium-high speed until pale and fluffy, about 5 minutes. Add egg and beat until combined well.  At low speed, mix in flour and buttermilk mixtures alternately in batches, beginning and ending with flour mixture and mixing until smooth. Mix in zucchini until just incorporated.

Spoon 1/4-cup mounds of batter 2 inches apart on baking sheets.  (These spread A LOT so give the batter a lot of space.)  Bake, switching position of sheets halfway through, until tops are puffed and golden and spring back when touched, 18 to 22 minutes. Transfer with a spatula to a rack to cool completely.

Make filling: Beat together butter, confectioners sugar then add in the marshmallow fluff, and vanilla in a bowl with electric mixer at medium speed until smooth, about 3 minutes.

Assemble pies: Spread a rounded tablespoon filling on flat sides of half of cakes and top with remaining cakes.

Cakes can be made 3 days ahead and kept, layered between sheets of wax paper, in an airtight container at room temperature.

Filling can be made 4 hours ahead and kept, covered, at room temperature. Refrigerate if you aren’t going to use it before then.

Marshmallow Fluff

Makes 2 cups
3 egg whites
2/3 cup sugar

Make a double boiler by bringing a small pot of water to a bare simmer, then place the bowl of your stand mixer, if you’ve got one, or another large stainless steel bowl atop the water. Add the egg whites and sugar, and whisk continuously until the sugar dissolves and the liquid is warm to the touch.

Transfer the bowl from the stovetop to your stand mixer (you’ll probably want to wipe the condensation from its bottom before securing), and use the whisk attachment to whip the liquid on medium-high speed until it turns glossy with stiff peaks, about 8 minutes. If you don’t have a stand mixer, do the same with your electric hand mixer.

Eat immediately or refrigerate for no more than a week.

Tuesday, August 20, 2013

new at the market.

Obsessing over these incredible teeny-tiny baby tomatoes. 

They are so small yet intensely tomato flavored and best served with burrata, a drizzle of olive oil, and a sprinkle of the best flaky sea salt.  

A wedge of really good bread really rounds out the meal.  

Or you can do as I do which involves popping them into your mouth like candy each time you pass the container of them sitting on the counter.  

Hoping I can find some more next week because I am in love with them.

Tomato season stole my heart.    

Monday, August 19, 2013

roasted jalapeno peach jam.


As of late, jam has been on my mind.  It started when I realized I had already blown through my stash of strawberry jam in less than 2 months.  (Peanut butter and jelly is a staple of my diet and I have no shame in admitting I am partial to lunches usually favored by those under the age of 10.)  I mourned this loss and then I realized its summer and fresh fruit is everywhere and just because strawberry season is over doesn’t mean I can’t have cherry jam or apricot jam or some other delightful flavor.  

But then on Friday while the boy and I dined at one of those cozy wine bars where you need a flashlight to read the menu (candles while romantic and pretty are not always conducive to studying menus), I had a light bulb moment about jam.   We ordered a cheese and charcuterie plate that came with a sweet and spicy apricot mustard spread that made me realize I had been thinking about jam all wrong.  Jam doesn’t need to be a singular flavor to be used solely as a topping for toast or as a filling for cookies, it can be multi-dimensional and composed of unusual flavors.  With that thought roasted jalapeno peach jam was born. 

This jam begs for grilled cheese, a charcuterie board, or a roast chicken sandwich.  It’s bold and assertive but not overpowering.  The jalapeno heat is subtle but present.  The peach is sweet yet not cloying.  It’s balanced and perfect and I love it on toast with a side of scrambled eggs since a little heat at breakfast is always a good thing. 

Roasted Jalapeno Peach Jam
Makes about 2 cups

About 2 pounds of peaches, peeled and diced (awesome tutorial here about how to peel peaches)
1 jalapeno
1 cup sugar
Juice of 1 lemon

Roast the jalapeno.  You can do this over an open flame, turning the jalapeno until it blackens on all sides or in the oven by roasting for 10 minutes at 500 degrees until the jalapeno is black (turn the jalapeno on occasion).  Place the blackened jalapeno in a plastic bag and let rest for about 15 minutes or until cool enough to handle. 

Scrape the skin off the jalapeno and then seed and mince it.  Place the jalapeno in a large bowl along with the diced peaches.  Pour the sugar and lemon juice over the peach/jalapeno mixture and stir to coat.  Cover the bowl and let sit for about 3 hours to allow the fruit to macerate.  (If you can’t get back to the jam in 3 hours, you can let it macerate overnight in the fridge). 

Pour the macerated peach mixture into a heavy bottomed pot.  Allow the mixture to cook over medium heat for about 10 -12 minutes or until the peaches begin to breakdown and the mixture thickens slightly.  Turn off the heat and allow the mixture to cool for 10 minutes. 

Transfer ¾ of the peach mixture to a blender or food processor (if you prefer a chunkier jam you can transfer only half if you prefer a smooth jam, transfer all of it) and puree until smooth.  Return the mixture to the pot and bring to a boil.  Reduce the heat to low and simmer gently for 10 – 12 minutes (stir on occasion to prevent scorching).  To test if the jam is ready, drop a heaping teaspoonful onto a plate and slightly tilt the plate. The jam should not run off, but cling and slowly glide down. If the jam isn’t ready, put it back on the heat for a while.

When cool, spoon the jam into a jar and refrigerate.  Use within 2 months of making. 

Wednesday, August 14, 2013

grilled watermelon salad.


This isn't so much a recipe as it is a suggestion - go grill watermelon.  I've had grilled watermelon in my head for a couple months now, ever since I saw one of those gorgeous instagram photos that one of the incredible food photographers I follow had taken.  The photo oozed summer, steamy evenings, and backyard BBQ's. I was instantly smitten.   This is a salad that is utterly simple but it's simplicity stresses the need for produce of the highest quality.  This is the time to visit the farmers market to buy a Sugar Baby watermelon (that name kills me) or some other heirloom variety because a good quality watermelon is the star ingredient in a recipe like this.  Here the other components simply exist to enhance the flavor of the watermelon and they do a wonderful job of that - salty cheese, fresh mint, sour lime, sweet and spicy honey.  It's summer perfection on a plate and the kind of thing best eaten outside where the juices can dribble down your chin and into the grass.  

Grilled Watermelon Salad

I went in a more Middle Eastern direction with my salad but this could easily take a Mexican route by swapping the feta for queso fresco and the mint for cilantro.  Or it could be more Italian with ricotta salata and basil.  The possibilities are endless.  

1/2 a small watermelon sliced in 1/2 inch - 3/4 inch thick wedges
1 tablespoon mint, minced
1/4 cup feta
Juice of 1 lime
1 tablespoon Mikes Hot Honey or regular honey

Preheat your grill or grill pan over medium-high heat.  When hot place the watermelon slices in a single layer. Allow to cook for 3 minutes and then check for char lines.  When you have them, flip and cook on the other side for 3 minutes.  Remove the watermelon from the grill pan and place on a large platter.  Cook any remaining watermelon slices in the same manner.  Crumble the feta over the watermelon and sprinkle the minced mint. Pour the lime juice over the watermelon and drizzle with honey.  Eat! 


Tuesday, August 13, 2013

season change.

If I had the ability to alter my kitchen with the seasons, the below is what fall would look like.  

That island is beckoning me to bake rustic boules, roll out crust for apple pies, puree butternut squashes for soups, and chop vegetables for slowly simmered pasta sauces, hearty sauces that cling to every strand of pasta.  

With the blink of an eye, fall will be here.  (I kind of can't wait.)

Alhambra Kitchen by Jessica Helgerson

Image via Jessica Helgerson Interior Design

Monday, August 12, 2013

cinnamon-sugar plum cake.


This cake will probably not be winning any beauty contests any time soon.  There are far too many gorgeous plum cake and tart specimens out there, cakes with perfectly layered rings of sliced purple or yellow plums. But, what this cake lacks for in the looks department it more than makes up for in the taste department.  This is a homey cake, the kind of thing you serve after a meal of farmer's market produce.  The cake is as simple as can be with a light and subtly spiced taste which allows for the plums to steal the show.  As the cake bakes, the plums practically melt to create a jammy layer of fruit.  The cinnamon sugar topping provides a little crunch which is the perfect textural contrast.  Served with a dollop of whipped cream of homemade vanilla ice cream and you have the perfect rustic summer dessert.  

Cinnamon-Sugar Plum Cake
Recipe adapted (barely) from Bon Appetit

1 ¼ cups all purpose flour
1 teaspoon baking powder
¼ teaspoon salt
½ cup (1 stick) unsalted butter, room temperature
¾ cup plus 1 1/2 tablespoons sugar
2 large eggs
1 tablespoon fresh lemon juice
1 teaspoon grated lemon peel
½ teaspoon ground cinnamon, divided
½ teaspoon ground ginger, divided
5 large plums (about 1 1/4 pounds), pitted, cut into 1/2-inch wedges

Preheat oven to 350°F. Butter 9-inch-diameter springform pan. Whisk first 3 ingredients along with ¼ teaspoon cinnamon and ¼ teaspoon ginger in small bowl to blend. Using electric mixer, beat butter in large bowl until fluffy. Beat in 3/4 cup sugar. Add eggs 1 at a time, then lemon juice and lemon peel, beating until blended after each addition. Beat in flour mixture. Spread batter in prepared pan.

Press plum wedges halfway into batter in concentric circles, spacing slightly apart. Mix remaining 1 1/2 tablespoons sugar, cinnamon, and ginger in small bowl; sprinkle over plums. Bake until cake is browned on top and tester inserted into center comes out clean, about 50 minutes. Cut around cake; release pan sides. Serve cake warm or at room temperature.


Sunday, August 11, 2013

fire.

A father admiring all of his hard work at the inauguration fire in the rock/fire pit he built.  (It's really awesome.)  


(I've spent the better part of the last 24 hours dreaming of all the foods I could cook over an open flame - hot dogs on a stick (my mom's personal favorite), watermelon, hallomi cheese, lamb saussage, marshmallows, pizza (on a metal grate), whole peppers, eggplants cooked in the embers, corn on the cob, skirt steak for fajitas, the list goes on.)

This is the epitome of summer. 

Wednesday, August 7, 2013

arepas.


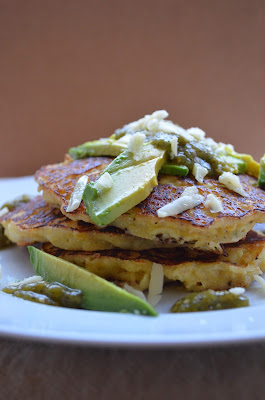
I have vivid childhood memories of eating corn pancakes for dinner.  I don’t know why this particular food conjures up such a bold memory, perhaps it’s because there is a certain novelty to eating something doused in maple syrup for dinner but come summertime, I can’t get that memory out of my head.  I have yet to tackle my own version of corn pancakes, mostly because there are certain foods that are tied to such specific memories and feelings, it’s hard to imagine that a homemade version made by anyone but my mother would be capable of fulfilling any of my cravings.  At some point here I will finally bite the bullet and attempt it (I have visions of corn pancakes and thick slices of bacon served on a rainy summer evening – the kind of thing best eaten in pj’s with someone you love), but until that happens I will settle for a variation of the theme.  These are Arepas according to Mark Bittman, and while I don’t know if I would fully agree with that name, I definitely agree with the flavor of the dish.  This is a comforting dish of corn and cheese encased in the thinnest of pancake like batters.  I like to serve it with slices of avocado and a generous pour of homemade roasted tomatillo salsa which makes for a fun riff on the traditional pancake dinner. 

Arepas
Recipe adapted from Mark Bittman on the NYTimes

Serves 2

1  cup cornmeal
¾ cup corn kernels (about 1 ear)
1 egg
1 cup milk
1 cup cheddar
Salt and pepper to taste
Butter or oil for greasing the pan
Accompaniments: Sliced jalapenos, sliced avocado, tomatillo salsa, hot sauce

Combine the cornmeal , corn kernels, and cheddar in a bowl.  Beat the egg with the milk.  Pour the milk and egg mixture over the cornmeal mixture and stir to combine.   Season with salt and pepper.  (Batter will be thin!). 

Heat a frying pan over medium high heat.  Grease the pan with the butter or oil.  Drop heaping spoonfuls of the batter on the pan (like you would pancakes).  Cook for 1 -2 minutes until cooked and golden brown, flip the pancake over and cook the other side for another minute.  Remove from the pan and repeat with the remaining batter.  Top the pancakes with the accompaniments of your choice.    

Tuesday, August 6, 2013

kombucha addiction.

After reading Michael Pollan's latest book called Cooked, I realized probiotic consumption was missing from my life which is why my drink of choice as of late has been kombucha.  Kombucha in a nutshell is fermented tea that is filled with probiotics.  I realize when I describe it to people that most find the sound of it to be completely unappealing but I can't get enough of it.  It's tart and tangy like green apple carbonated soda. The flavor is utterly addicting and it's healthy! 

Probiotics are the good bacteria that helps your tummy function well.  Most of us don't get enough probiotics since we are no longer a culture of fermented and un-pasteurized foods and while I don't believe this cures everything, it's been helping me with my never ending stress tummy aches.  I've been trying all sorts of different brands - local versions made in Brooklyn, bottled versions from Whole Foods, and most recently Health Ade which is company based out of California.  All of the versions have been superb (so bubbly and tart!) but now I plan on making my own, because well I love to try my hand at making homemade versions of everything.  I will be reporting back in a few weeks (and if you aren't crazy like me you can buy some at Whole Foods.) 

Monday, August 5, 2013

ginger and brown butter dark chocolate chunk cookies.


I've found chocolate chip cookie nirvana (at least for the moment).  

Yes, this is the closest I've ever come to chocolate chip cookie perfection (and I've been looking for a long time.)  Apparently the key to perfection is brown butter which may be the single greatest thing thing to happen to a cookie.  Brown butter if you are unfamiliar with it and all its goodness is basically cooked butter. As the butter cooks it develops a bold nutty taste.  It's the complex, intriguing cousin to regular butter and it's my new best friend.  The butter brings an unbelievable extra dimension of flavor to the cookie.  A super deep and complex caramel flavor that has me addicted.  The ginger is genius.  It brings a level of spice that is subtle but leaves you wondering what just hit your tongue.  Together all the components just work to produce a cookie that is magical and my new favorite.  

Ginger and Brown Butter Dark Chocolate Chunk Cookies
Recipe from Une Gamine dans La Cusine 

Makes about 12 LARGE cookies


11 tablespoons butter, softened to room temperature
1 tablespoon pure vanilla extract 
1/2 cup granulated sugar
2 teaspoons fresh ground ginger (or 1 teaspoon ground ginger)
1 3/4 cup all-purpose flour
3/4 teaspoon baking powder
3/4 teaspoon baking soda
1/2 teaspoon salt
1/2 cup + 3 tablespoons light brown sugar
1 egg, lightly beaten
7 oz bittersweet chocolate, chopped or chips
Fleur de sel, for sprinkling (optional but highly recommend)

Melt 10 Tablespoons of butter in a medium saucepan (set the remaining 1 Tablespoon aside). Cook over medium heat, swirling occasionally, until the butter turns brown and develops a rich nutty aroma- about 5-8 minutes, depending on the heat. {Note: The butter will go through a "foamy" stage, once it settles down, keep a close watch on the colour.} Remove the pan from the heat and stir in the vanilla extract. Set aside to cool to room temperature. 

In the bowl of a stand mixer, combine the granulated sugar and fresh ginger. Use your fingers to rub the ginger into the sugar until it's slightly moistened and fragrant; Set aside. {Note: If you're using ground ginger, just toss it in with the dry ingredients.}

In a separate large bowl, whisk together the flour, baking powder, baking soda, salt, and brown sugar (and ground ginger, if using instead of fresh). Add this mixture to the bowl of granulated sugar/ginger. Whisk to combine. Add the cooled brown butter and the remaining 1 Tablespoon of butter. Using the paddle attachment, beat on med-low until you're left with something that resembles clumpy, wet sand.  Add the egg and beat on low until just combined. Switch over to a large rubber spatula and fold in both chopped chocolates.{Note: My batter was a tad dry, but once I started forming the dough into cookies, it became more cohesive.} 

Line a cookie sheet with parchment paper. For each cookie, measure out about a 1/3 cup of dough. Form each into a ball, place on the cookie sheet, and flatten slightly (to a little less than 1/2-inch thickness). Once all the dough has been measured out, cover the sheet with plastic wrap and chill for about 12 hours. Note: The longer you chill the dough, the better the flavor

When you're ready to bake: Preheat the oven to 400 F. Line another cookie sheet with parchment paper. Place about 4 cookies on the sheet--leave about 1-inch of space between each cookie. Sprinkle with a little bit of Fleur de sel (if using). Bake for 8-11 minutes, or until the cookies are light golden in colour. {Note: My cookies were perfect after 9 minutes.} The cookies may look uncooked in the middle but they will firm up as they cool. Remove the sheet from the oven and allow the cookies to rest for about 8 minutes before transferring them to a cooling rack.  


Thursday, August 1, 2013

corn pizza with bacon.


Last year when I wrote about corn pizza, I imagined that would be the only recipe for corn pizza on the blog because really, how many recipes can there possibly be for corn pizza.  There is only so much wheel reinvention that can happen between corn and crust.   But I was wrong!  Oh, how wrong I was because there is a whole other world of corn pizza that I didn’t tackle and I only just realized that after reading my latest cookbook acquisition I Heart New York.   Corn puree.  Actually it’s a corn puree and mascarpone and it really is the most wonderful tasting thing.  A little sweet, a little tangy, a whole lot of creamy, and very addicting (it may have been consumed by the spoonful which I am not in the slight bit embarrassed to admit).  This corn puree is generously applied to the crust where it stands in as a sauce (oh it’s such a good sauce).  It’s topped with cubes of rich, smoky bacon, a handful of sweet corn kernels, and when it emerges from the oven a (healthy) sprinkle of aged raw milk cheddar.  It is absurdly amazing with a pure sweet corn taste that marries beautifully with the salty cheese and bacon.  I won’t say it’s better or worse than my previous corn pizza recipe (you can’t expect me to play favorites) but I plan on making it again this weekend if that’s any indication of how I feel.

Corn Pizza with Bacon
Recipe adapted from I Love New York By Daniel Humm and Will Guidara

The cookbook suggests making this on the grill but my grill situation was not up to snuff so I can't advise on that. I plan on remaking it on the grill when I am home at my parents next week (FYI Mom and Dad!) so I can report back on that then! Below are the instructions for cooking this in the oven which works absurdly well.  

Makes 4 pizzas

1 batch of my favorite pizza dough
Corn pudding (recipe below)
1/4 cup mascarpone
1 cup fresh corn kernels (from 1 ear of corn)
1/2 cup diced (1/8 inch) uncooked bacon
Red chile flakes
4 ounces grated raw cow milk cheddar (or something similar - I found mine at Whole Foods)
Basil for topping if you choose

Remove the pizza dough from the refridgerator and allow to proof for 1 hour at room temperature.  While it is proofing preheat you oven to 500 degrees (or as hot as it gets) and place your pizza stone in the oven if you have one (if you don't use a baking sheet). Combine the corn pudding with the mascarpone in a medium bowl. When the dough is done proofing, stretch one of the pieces of dough into an oval.  Remove the pizza stone or baking sheet from the oven and place the dough on top of the stone.  Working quickly, top the dough with 3/4 cup of the corn pudding mixture, 1/4 cup of the corn kernels, 2 tablespoons of bacon, and a pinch of chile flakes.  Return the pizza to the oven and cook for about 10 minutes or until the dough is cooked and charred in spots and the bacon is cooked.  Remove the pizza from the oven and sprinkle with 1 ounce of the grated cheese.  Repeat with the remaining ingredients to make 4 pizzas.  

Corn Pudding
Recipe adapted from I Love New York By Daniel Humm and Will Guidara

I tried to streamline this part mostly because I didn’t exactly understand where this corn juice was coming from that they use in the recipe.  But my work exceptionally well!

2 cups corn kernels (from about 5 ears of corn)
¼ cup water or milk
3 tablespoons mascarpone
¾ teaspoon salt

Place the corn kernels in a food processor and process until a chunky puree forms.  While the machine is running, pour a tablespoon of water in at a time.  Continue pouring in water a little at a time until the puree smoothes out a little (its fine for it to still be a little chunky since you don’t want to add too much water). 

Dump the corn puree into a medium saucepan over medium-high heat while whisking constantly.  After 1 ½ to 2 minute, as the starches in the corn juice just start to thicken, turn down the hear slightly to avoid scorching.  Whisk until the corn reaches a puddinglike thickness, another 3 to 4 minutes.  Remove the pan from the heat and whisk in the mascarpone.  Season with salt.  Allow to cool and then transfer to an airtight container and refrigerate for up to 3 days.