recipes.

Friday, August 29, 2014

heirloom tomato jam.

Last week when apricot jam was discussed, my mindset was I was done with jam for the season (4 jams in 4 months seemed like more than enough).  

I was wrong to think such a thing. Oh so wrong.  

In the span of 3 days I somehow ended up with over 6 pounds of tomatoes.  Considering tomatoes have such a short shelf life and there are only 2 of us I knew I needed to find a tomato option that would use up about half of these guys and quickly.  

This is how I fell down the hole of tomato jam land.  

Tomato jam is really a fancy name for a thick rustic ketchup-like condiment.  Some recipes take the jam concept very seriously by adding something in the realm of 2 CUPS OF SUGAR to 3 POUNDS OF TOMATOES which is insane to me (though I will admit the sugar is somewhat necessary if you want to preserve the jam).  I was aching for a savory jam.  The kind of thing that begs to be served on a toasted baguette with a poached egg and avocado.  The kind of thing you can spread on grilled cheese or a BLT or even on a veggie burger.  I wanted the juxtaposition of savory and sweet with a kick of heat and a tang of acidity.  

Somehow I ended up making exactly what I was craving (don't you love when that happens?).  This jam has been consumed by the spoonful.  It's been slathered on bread and eaten with hardboiled egg.  Its been served on toast with a dollop of ricotta.  It's the perfect thing for this weird in-between season time of year and it somehow works with just about anything and everything.  


Heirloom Tomato Jam
Recipe adapted from A Cozy Kitchen

3 pounds red heirloom tomatoes
2 tablespoons light brown sugar
Pinch of salt
2 tablespoons red wine vinegar

Hull and cut the tomatoes into a rough dice. If you’re using heirloom tomatoes, be sure to cut off any tough, brown spots that might be on their skin. Transfer the chopped tomatoes to a non-reactive medium pot, along with the brown sugar, salt and red wine vinegar. Place the uncovered pot over medium heat and bring the mixture to a simmer; cook for 30 minutes. At the 30 minute-mark add the dried thyme and mix. Cook for an additional 25 to 30 more minutes and until the mixture is thick. If you’re using more or less tomatoes, the cook time will definitely vary.

Allow to cool to room temperature. Transfer to a jar and store in the refrigerator. Tomato jam will be good for two weeks without canning.


Wednesday, August 27, 2014

i'm swooning.

Sometimes you see a picture that is EXACTLY what you have been thinking of and you begin to wonder whether someone crawled into your mind and took a picture of the thoughts inside your head.  

This is everything I want my wedding to be.  EVERYTHING.  I am swooning so hard it hurts.  

||


Image via Pinterest

Tuesday, August 26, 2014

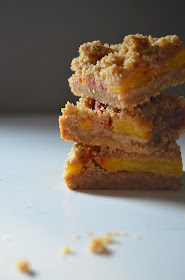
peach shortbread.

Last night marked the start of the Lovely Lady League aka the Fantasy Football league I am part of.  If you know me, you will know I spent the majority of the college football games that I attended reading the latest fashion magazines rather then actually paying attention to what was going on.  The fact that I am part of a Fantasy Football league is as shocking to me as it probably is to you.  I still don't watch the games (I find the sport rather dull) but Fantasy Football is like a really fun game and I can always get behind really fun games.

Getting a group of girls together on a Monday night to draft their football teams means plenty of snacks will be provided.  And good snacks! Nothing like what I imagine a group of guys would put together (namely cold pizza and even colder beer). Girls bring things like kale salads, smoky eggplant dip, lots of hummus and peach shortbread bars which was part of my contribution.

Peach shortbread bars beg to be served to a crowd and this particular recipe is a real crowd-pleaser. Tender subtly sweet and barely spiced shortbread provides the perfect base for juicy-at-the-peak-of-ripeness peaches.  The whole thing is topped with some of the remaining crumbled shortbread which makes this bar like a peach crumble pie/cookie hybrid which may be the best kind of hybrid out there.  

Peach Shortbread
Recipe adapted from Smitten Kitchen

You can halve this and bake it in a 8 x 8 pan instead.  If you do halve it, you can still use the full egg or just a yolk.  

1 cup (7 ounces or 200 grams) white sugar
1 teaspoon (5 grams) baking powder
2 3/4 cups plus 2 tablespoons (12 5/8 ounces or 359 grams) cups all-purpose flour (or you can measure 3 cups and remove 2 tablespoons flour) (you can also do a combo of all-purpose and whole wheat like I did!)
1/2 teaspoon cinnamon
1/2 teaspoon ground ginger
1/8 teaspoon freshly grated nutmeg
1/4 teaspoon (2 grams) salt
1 cup (2 sticks or 8 ounces or 227 grams) cold unsalted butter
1 large egg
2 peaches, pitted and thinly sliced (between 1/8 and 1/4-inch thick)

Brown your butter: Melt butter in a small/medium saucepan over medium-low heat. It will melt, then foam, then turn clear golden and finally start to turn brown and smell nutty. Stir frequently, scraping up any bits from the bottom as you do. Keep your eyes on it; it burns very quickly after it browns and the very second that you turn around to do something else. Set it in the freezer until solid (about 30 minutes).

Preheat the oven to 375°F (190°C). Butter a 9×13 inch pan, or spray it with a nonstick spray. In a medium bowl, stir together sugar, baking powder, flour, salt and spices with a whisk. Use a pastry blender, fork or your fingertips, blend the solidified brown butter and egg into the flour mixture. It will be crumbly. Pat 3/4 of the crumbs into the bottom of the prepared pan, pressing firmly. Tile peach slices over crumb base in a single layer. Scatter remaining crumbs evenly over peaches and bake in preheated oven for 30 minutes, until top is slightly brown and you can see a little color around the edges. Cool completely in pan before cutting into squares.

Keeping: I’ve kept mine in the fridge and they've held up great there since Monday. I imagine that these would freeze well, between layers of waxed paper, with the container sealed well in plastic wrap.


Thursday, August 21, 2014

apricot jam.

Currently there are 4 different types of homemade jam in our fridge (rhubarb, cherry, peach-jalapeno, and apricot) and I am scared to know how many jars of purchased jam (if I had to throw a number out there I would say 3 but who can say with any degree of certainty).

I guess we like jam?  

Jam is one of those things I kind of love to make for a couple of reasons.

1 - When you tell people you made jam then give you a head tilt and a look of confusion because no one who lives in a city with at least 4 bodegas within a 2 block radius should be making something that can be purchased so easily but I like to challenge myself.  

2 - It makes me feel like Laura Ingalls of Little House on the Prairie.  She is my idol.  

3 - Homemade jam is infinitely better then what you can buy in the store. INFINITELY.  

The flavor of the summer is apricot because the farmers market I pass on the way to work has been selling a pound of apricots for $3 and that my friends is a steal.  Apricot jam is also the bee's knees because it pairs incredibly well with savory items (I am partial to eating it with turkey and brie) as well as sweet (like toast aka my favorite food).  I dialed back the sugar on the original recipe by a great deal because I enjoy a little bit of tart (apricots as they cook down get very tart!) and a little bit of sweet.  It allows the flavor of the fruit to really shine and isn't that the whole point of jam?

Apricot Jam
Recipe adapted from the Homesick Texan

1 pound of apricots, pits removed and quartered (4 cups)
1 1/2 cups of sugar
4 tablespoons of lemon juice (about one lemon) plus zest

Place the apricots, sugar, lemon juice and zest in a pot, and add a couple of tablespoons of water.


Place a plate into the freezer.

Turn the heat to medium, and stirring every five minutes or so, let the fruit cook. It will first get juicy with the fruit intact, and then the fruit will start to disintegrate. As it cooks, there will be foam on top, but just keep stirring, don’t worry about skimming it.

After about 15 - 20 minutes the jam will be about two or three shades darker and will be smooth and thick, with a few lumps here and there. When it coats the back of a spoon, take out the plate from the freezer and place a dollop of the jam on the plate. If it runs, cook it for five more minutes and then test it again. But if becomes solid, then the jam is done.

Store jam in the fridge.  Will keep for about a month if not longer.  

Makes about one pint.


Tuesday, August 19, 2014

warm.

Casey DeBois's New York City Apartment Tour | The Everygirl

This chandelier is breathtakingly beautiful.  I love the contrast of gold, glass, wood, and leather.  It's somehow warm and sexy and the epitome of everything I am currently obsessed with.

Image via Pinterest.  

Monday, August 18, 2014

tomato galette with goat cheese and rosemary.

Somehow summer has escaped me and I can't entirely figure out how it happened.  

With 2 weeks to go until Labor Day, the boy and I decided, despite the cooler summer temperatures, that it was time to make a trip to the beach (because what's summer without at least one trip to the beach). Sandwiches were made, freshly baked cookies were packed, orange Gatorade was purchased (it's my favorite, don't judge).  We lay in the sand with books (and Kindle's) in our hands. The new fall fashion magazines were devoured and check lists were made of fall must haves (a light grey crewneck sweater and pinstripe work pants please).  The day ended with a walk down the Asbury Park boardwalk and the consumption of one too many Korean fusion tacos.  It was kind of perfect.  

I figured if I was going to embrace summer, I might as well keep it a consistent weekend theme which is how I found myself turning the most glorious heirloom cherry tomatoes into a galette.  A whole wheat crust was made.  Tomatoes both halved and quartered were tossed with olive oil, rosemary, and crumbled goat cheese and then piled into the center of the whole wheat crust.  As the galette baked, the tomatoes began to char and breakdown, their juices mingling with the rosemary and goat cheese.  And then we ate it, by the last rays of Sunday night light.  

Tomato Galette with Goat Cheese and Rosemary

1 batch of dough (recipe below)
550 grams of assorted cherry tomatoes (the more assorted the better) or about 4 cups halved and quartered
2 ounces of crumbled goat cheese
1 tablespoon olive oil
salt and pepper to taste
2 tablespoons rosemary

Preheat the oven to 400°. 

Line a large rimless baking sheet with parchment paper.

In a bowl combine the tomatoes, goat cheese, olive oil, salt, pepper, and rosemary.  Toss to combine and set aside.

On a lightly floured surface, roll out the dough to a 14-inch round. Transfer it to the baking sheet.

Spread the tomatoes on top of the dough leaving a 2 inch border all around.  Fold up the edges of the dough over the filling.  

Bake in the middle of the oven for about 35 minutes or until the tomatoes are burst and the pastry and browned and cooked through.  Let cool before serving.

Galette Dough
Recipe adapted from Food and Wine

2/3 cup all-purpose flour
1/3 cup whole wheat flour
1/2 teaspoon sugar
Pinch of salt
6 tablespoons cold unsalted butter, cut into 1/2-inch pieces
3-4 tablespoons ice water

In a bowl, mix the flour with the sugar and salt. Using a pastry blender or your fingers, cut in half of the butter until the mixture resembles coarse meal. Cut in the remaining butter until the largest pieces are the size of lima beans. Drizzle the water over the dough and stir until moistened. (Start with 3 tablespoons and add more if needed.)  Gather up the dough and knead it 2 or 3 times. Flatten the dough into a disk, wrap in plastic and refrigerate for at least 30 minutes.


Thursday, August 14, 2014

grapefruit and dark chocolate olive oil cookies.

I know we are in the throws of summer and it seems absurd to be discussing chocolate when there is so many stone fruit options available right now (peaches! plums!), but sometimes a girl just needs some chocolate (especially when this girl is in the throws of wedding planning). So that's why these cookies came to be. 

And these cookies? These cookies are intense in the best possible way. 

(How could something involving chocolate and more chocolate be anything but intense?)

Fruity olive oil paired with grapefruit zest makes for an incredible base for a chocolate filled cookie.  The combination of coffee and olive oil and zest makes these perfectly appropriate for all of the adults in your life (though I would be hard pressed to imagine I child would spit one of these out). The chocolate chips provide a nice amount of textural contrast to the soft (veering on under-baked in the best possible way) cookie.  And the sprinkle of sea salt?  Well a sprinkle of flaky sea salt is always a good idea when dealing with chocolate.  


Grapefruit and Dark Chocolate Olive Oil Cookies
Recipe adapted from Une Gamine dans la Cuisine

Makes 16-18 cookies

Grated zest of one medium grapefruit or orange
1 cup sugar
1 teaspoon baking soda
1 tablespoon hot brewed coffee (or hot water)
½ cup extra virgin olive oil
2 room temperature eggs
½ cup all-purpose flour
¼ cup rye or whole wheat flour
¾ cup unsweetened cocoa powder
¼ teaspoon salt
1 teaspoon pure vanilla extract
2 cups bittersweet (or semi-sweet) chocolate chips
Sea salt; for garnish

In stand mixer bowl, combine grapefruit or orange zest and sugar; use your fingertips to rub zest into sugar until moist and aromatic - set bowl aside for a few minutes.

In a separate small bowl, combine the baking soda and hot coffee. Mix soda into coffee until dissolved; set aside.  

Add olive oil to grapefruit or orange-sugar mixture. With the paddle attachment, beat on med-high speed until combined. Add eggs, one at a time, beating for about one minute after each addition. Add flour, cocoa, and salt; beat on med-low speed until dough thickens (it should have the consistency of a loose brownie batter).

Add baking soda-coffee mixture and vanilla extract. Beat on med-high speed until combined. Switch to a large rubber spatula or wooden spoon and stir in chocolate chips. 

Cover bowl and refrigerate for at least three hours (or overnight).   After allowing the dough to rest in the fridge for a couple of hours, measure out the dough into heaping tablespoons and place on a baking sheet.  Allow the un-baked dough to continue to chill, covered, in the fridge overnight. 

Preheat oven to 350 F.  Line baking sheets with parchment paper.

Arrange cookies on prepared sheet, allowing for about 2-inches of space between each one. Sprinkle with sea salt.

Bake 10-12 minutes or until edges are set.

Remove sheets from oven and cool completely before transferring cookies to cooling rack. 


Wednesday, August 13, 2014

review: henry public.


As much as I love fancy-shmancy beautifully plated we need to be dressed up to eat dinner kind of meals, at my heart I am a pizza or burger and beer kind of girl (best eaten while wearing worn in jeans and a tee). Follow it up with some ice cream and chocolate chip cookies and you pretty much have my ideal date (Tyler, I hope you have taken note).  When Tyler and I decided to trek to Brooklyn this past weekend in search for the ideal wedding cake(s) (we think we found them), I decided it only made sense to turn the trip into an adventure and stop for the world's best burger (followed by some of the best ice cream).  

 It's Yes, I said world's best burger.  

There is a place in Brooklyn called Henry Public that if you were to walk by it your would think it was just another neighborhood bar.  Yes, it is a neighborhood bar, but it is so much more then just a bar.  It's a place that serves drinks and really elevated and really incredible food.  It's the kind of place I wish I lived around the corner from though if I did my burger consumption would increase drastically.  

The burger is life changing.  The first time I had it I realized I never knew what a good burger tasted like.  Grass-fed freshly ground free range beef is cooked to perfection (medium-rare please) and topped with the most incredible aged cheddar.  It's served on a toasted bun with the crispiest of french fries.  It's simple and timeless and exactly what a burger should be.  No frills.  No toppings.  Just meat and cheese and bun. It's the burger for burger purists (which is what I am).  

If you are fortunate enough to dine with a companion who is willing to eat something other then a burger, might I steer you in the direction of the turkey leg sandwich?  The same sandwich mentioned in NYMag's latest cheap eats issue.  It's kind of epic and incredibly delicious and super messy in the best possible way.  I happily shared my burger with the boy in exchange for a couple of bites of his sandwich (and considering my affinity for this burger I think this goes to show how good the turkey sandwich is).

Did I mention the inside of the restaurant is like an old-timey civil war bar?  Well it is and it's awesome.  

Tuesday, August 12, 2014

corn on the cob with miso-honey butter.

I'm going to go out on a limb and say there is no food more quintessentially summer then corn on the cob (especially corn on the cob dripping in salted butter).

(I will give you 5 minutes to try and think of another.  I guarantee you will loose this game.)

But corn on the cob with plain old butter is old news.  There is a new preparation in town that is even better.

Miso-honey butter.
(Yes, you read that right.)

Miso is my addiction.  It makes everything better.  Something about that salty bite and it's umami flavor is un-paralleled.  It elevates everything it comes into contact with.  And when it comes into contact with corn?  The flavor has me practically weeping.  Here I mix softened butter with just enough miso to provide a nice salty bite. The addition of honey (in particular Mike's Hot Honey which in addition to miso is my other addiction) provides the perfect hint of sweetness and spice.  Slathered on hot corn?   There is nothing better. (This is my new summer staple.)


Miso-Honey Butter

Makes a generous 2 tablespoons of butter.  

2 tablespoons softened butter
2 teaspoons white miso
1 1/2 teaspoons Mikes Hot Honey (or use regular honey and the smallest pinch of cayenne)

In a small bowl mix butter, miso, honey until combined.  

Slather on anything and everything (especially grilled corn).  

Can be stored in the fridge for many days if need be.   


Monday, August 11, 2014

wedding rug.

I am so over wedding planning.  That's all I have to say about that.  

(I wish I was here eating summer salads and aged cheeses instead of sitting on my couch looking at our wedding budget.)  

I love eating on the floor am I the only one?  This is my kind of dinner party space.   

Image Via: DesignLoveFest


Image via Pinterest.  

Wednesday, August 6, 2014

buttermilk bacon fat flour tortillas.

Tyler and I as of late seem to be playing a perpetual game of “What do we have in the fridge that we can cram into a tortilla for dinner tonight?”.  This is a rather fun game because

A – Everything tastes good in a tortilla. (True story.)

B - You get to come up with ridiculously fun combinations of things using all the leftovers in your fridge.  (A ¼ cup of beans, 1 ear of corn, some roasted poblanos, shredded monterey jack, and cherry tomatoes.  That sounds like an ideal taco filling.  I am also partial to the kale, corn, bean, and lime combination I created this past weekend.) 

This game is as fun as it is because I have developed a slight obsession with homemade flour tortillas.  It started a few months ago with these and now that I have discovered yet another recipe, I have found myself looking for just about any excuse to eat tacos (and who even needs an excuse?).  

This particular tortilla recipe is so perfect that I can't imagine I will ever need another one.  These tortillas cook up tender, almost buttery with the right mix of tang and smokiness.  The addition of bacon grease is pure genius (because how many people keep their grease never knowing what to do with it?  That would be me!).  I love them with scrambled eggs and hot sauce but let's be honest, I haven't met a filling they didn't work with.  

Buttermilk Bacon Fat Flour Tortillas
Recipe from The Homesick Texan's Family Table via Serious Eats 

This is a particularly awesome recipe for the summer because if you are anything like me, you've been eating BLT's or BLAT's at least once a week (if you haven't been, I think there is something wrong with you).  Now you can save all of that wonderful bacon flavoring and turn it into tortillas!  One meal turns into another.  


Makes 8 -10 Tortillas depending on how wide you make them.  

2 tablespoons bacon grease (see note)
2 tablespoons unsalted butter
2 cups all-purpose flour
1/2 teaspoon baking powder
1/4 teaspoon kosher salt
3/4 cup buttermilk

Combine the bacon grease and butter in a pot and cook over medium-low heat until bacon grease and butter have melted. Remove from heat.

In a bowl, stir together the flour, baking powder and salt. Pour in the melted fat mixture and stir until the flour is crumbly. Pour in the buttermilk and stir until a soft dough forms.

Place the dough on a floured surface and knead for 2 minutes until the dough is firm and smooth.
Cover the dough and let it rest for an hour. Divide the dough into 8 or 10 pieces and roll each piece into a ball.

One at a time, place a dough ball on a floured surface, pat it out into a 4-inch circle, and then roll with a rolling pin from the center out until the tortilla is thin and about 6 - 8 inches in diameter.

Keep the rolled-out tortillas covered, side by side, until you are ready to cook. (I usually have one cooking as I roll out another.)

In a dry cast iron skillet heated over medium heat, cook each tortilla for 30 seconds on one side, flip it, and then cook for 1 minute on the other side. It should start to puff up a bit. Flip it again and cook for 30 more seconds.

Cover the cooked tortilla with a cloth until you are ready to serve.

Repeat with the remaining balls of dough.

Note: Bacon grease is what's left over in the skillet after cooking bacon. To save my bacon grease, I pour it into a glass jar and store it in the refrigerator.


Tuesday, August 5, 2014

hide me.

Can I hide here?

(Currently at a stress level of like 1000.)

I just want to sit here and eat toast with salted butter and peach jam (with some cheesey scrambled eggs), drink iced coffee, and read the latest Harper's Bazzar.  

And then I want to cook pasta with tomatoes and clams and a plum galette.  

(The hard industrtial windows with the exposed brick and wood gets me every time.)  

nice brick


Image via Pinterest.  

Monday, August 4, 2014

haricots verts with minty tahini dressing.

This is the best thing I've eaten in a very long time.  

I find this just as hard to believe as you do considering it's summer and most of what I've eaten over the last few weeks involves fruit encased in a flaky buttery crust (i.e. cherry pie and apricot tart and cherry brown butter bars). I never expected string beans (or if feel like being fancy haricots verts) to top my July 2014 Best Eats list (am I the only one who makes monthly best of lists?) but it is (!) and I am here to suggest you put down the butter and get out the tahini.  

Bon Appetit describes this dressing as ranch dressing that spent a couple of weeks traipsing through the Middle East.  I describe it as the best thing to be poured over summer vegetables since miso-peanut dressing.  I don't know how the magic happens, truthfully I don't want to know, but somehow the combination of tahini, olive oil, and lemon juice joins together to make a dressing that is creamier then any other dressing I have ever encountered.  It's thick and rich and when poured over grean beans and bulger it turns the simplest of ingredients into a salad that you just can't stop eating.  So go and eat this now and then I suggest you follow it up with some peach pie because what's better then a meal of summer's greatest hits?  


Haricots Verts with Minty Tahini Dressing
Recipe adapted (barely) from Bon Appetit 

Serves 4 generously or 6 as a side 

¼ cup cracked or uncracked freekeh or bulger, rinsed
Kosher salt
1 pound haricots verts, trimmed
1 small garlic clove, finely grated
2 tablespoons fresh lemon juice
2 tablespoons olive oil
2 tablespoons tahini
½ teaspoon dried mint
½ teaspoon pure maple syrup
¼ cup coarsely chopped walnuts
¼ cup fresh cilantro leaves with tender stems
¼ cup fresh flat-leaf parsley leaves with tender stems
¼ teaspoon Aleppo pepper or crushed red pepper flakes

Cook freekeh or bulger in a large saucepan of salted simmering water according to package directions.

Meanwhile, cook haricots verts in a small pot of boiling salted water until crisp-tender, about 4 minutes. Drain and transfer to a large bowl of ice water; let cool. Drain, and then pat dry.

Whisk garlic, lemon juice, oil, tahini, mint, maple syrup, and 1 tsp. water in a large bowl; season with salt. Add freekeh or bulger  and haricots verts and toss gently to coat; season with salt.

Serve freekeh/bulger and haricots verts topped with walnuts, cilantro, dill, parsley, and Aleppo pepper.

Do Ahead: Freekeh/bulger and haricots verts can be cooked 2 days ahead. Cover and chill separately.